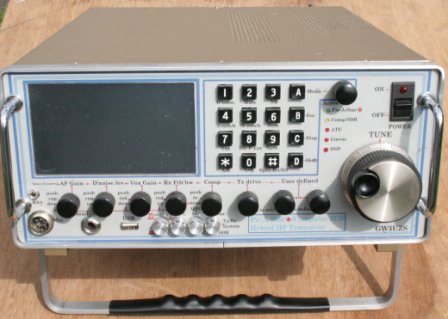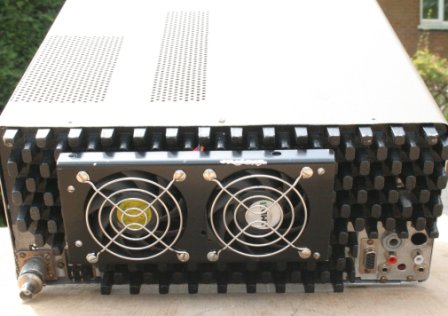

Jeff, GW3UZS, PICASTAR Build
Since Jeff's previous mail of late Jan, 2009 (further down page) Jeff has moved along even more with his construction.
Last updated on May 30th, 2012
Jeff has now done much more work on his STAR and the result is a credit to him.
Hi All,
As you know I have had this project on the go for about 3 to 4 years . Initially I built the classic star (as per the pictures at end of this page) and operated it breadboard style for about 6 to 8 months then put it all in a cardboard box due to other activities such as building a QRO solid state amp and other domestic matters.
However, having collected all the bits to build the Trxavr / TFT_A etc and I was determined over the last winter to build the trxavr etc and put it all in a box. The project is still not complete but it looks a bit better and in use every day on 80M and sometimes 20M/15M. As a matter of interest you will see from the pictures that I have also built into the box a computer SDR tranceiver set up at 10.7 MHz, similar to the Softrock kits but with a number of changes to allow a suitable interface. This uses a modified Power SDR software which allows me a panoramic display on the computer and an AM transmit and receive mode to go with my interest in vintage equipment. { Jeff's interface schematic is here}
Generally , the main items on the ‘ yet to do’ list is the auto atu, revisit the butler osc (it drifts to much) and a complete re-alignment/set up.
I would like to take the opportunity to thank you all for the help and advice during some of the problems in programming the Atmel chips etc.
Without mentioning any names (because I am sure to leave someone off the long list of people that are worthy of credit), I take my hat off to all those involved in the original design, specification , making up of part kits etc and making available all the information (not forgetting all those involved in the original Classic Picastar) – its been a fantastic project.
Regards
Jeff GW3UZS
< click picture for larger size >
9th March, 2009
Hi Glenn,
I have now completed the 150W PA and is operational with a temporary LPF.
Attached are pics of the whole unit. Its a bit of a lash up at the moment and nowhere near the presentation by other builders but hopefully by next winter things should improve. The temporary LPF is attached under the heatsink and I have added a temporary 'S' meter since the last lot of pics. The heat sink is off a Pye base station which I have milled it to shape.
I like your single board version and I wonder if you have added SWR, power output, ALC/ PA protection to your project. I would also like to add Ian's (G3VPX)/ Dave's (G6ALU) Atmel display in due course. I will watch developments with interest. 73 Jeff GW3UZS
73 Jeff GW3UZS
Click most pictures for a larger view:
Jan 26th, 2009
Hi Glenn,
I have attached a few pictures of my PICASTAR build.
Most of the boards/screens are bolted together but the 20W PA and LPF are spread out over the bench at this stage.
I have had many QSO's with it since my 1st QSO with the homebrew net on 3.727Mhz with very good reports including one from Peter G3XJP.
At this stage the LPF is out of a Yaesu FT980 but this will be replaced by the G4TZR in due course
You will also note a very temporary front panel and I have not yet screened the IF sections or carried out a full setting up/alignment.
However, I have swept and aligned the BPF for each band and also the 20W PA (amazingly flat response from the PA from about 1.5MHz to about 25MHz - about 1dB down at 30MHz and about 4/5dB down at 50MHz). {Jeff used an MPSH10 in the 1st stage}
It will probably be next winter before I complete the case etc - I started building in early November and other things to do have suffered a little - must now give attention to other outstanding work.
73 Jeff GW3UZS
Click on picture for larger size. (then click again for even larger size < ~1Mb pics)
New page created on 27th, Jan, 2009 by VK3PE
Last updated on June 5, 2012